XML Imports
With JobBoard.io you can import jobs from 3rd party XML job feeds without any code. JobBoard.io can pull job content from third party XML feeds and automatically post them to your job board on a daily schedule.
The Auto Import Jobs feature allows you to map feed specific XML tags to the correct fields on your job board. This means JobBoard.io works with virtually any XML job source, without a need to follow any preset naming conventions.
RSS Feed?Please note that RSS is different to XML.
RSS feeds will not usually contain enough data to create a job listing.
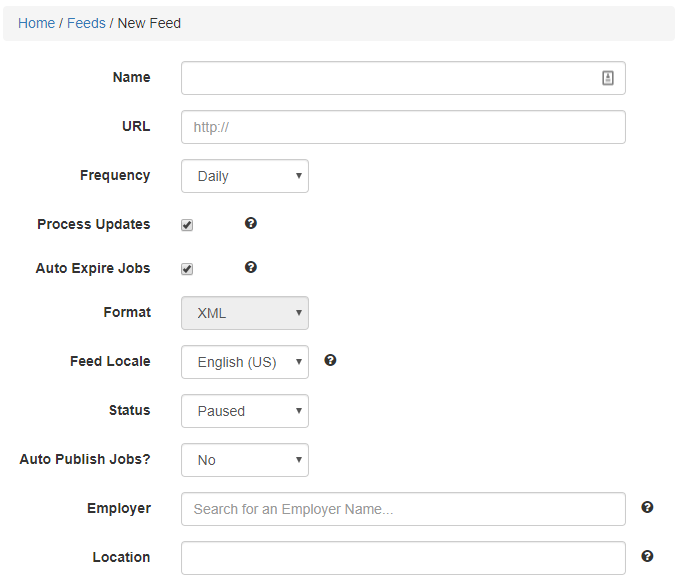
Feed setup is broken up into two sections. The first section is where you'll set up the basic info for the feed. The second allows you to map custom field names. To begin the process of creating a feed, click Job Settings in the left sidebar, choose Auto Import, then click Create New Feed.
Basic Feed Setup

- Name - Name your feed. Use a descriptive name that will help you identify the feed in the future.
- URL - Enter the URL where the feed can be accessed. Entering this URL in your browser should display the job data in the feed.
- Frequency - Choose how often jobs from the feed are imported; Daily, Weekly, or Monthly.
- Process Updates - If this box is checked, existing jobs will be updated according to changes in the feed.
- Auto Expire Jobs - If this box is checked, jobs that drop out of the feed will be automatically expired the next time the feed is processed.
- Format - At this time only XML is available. If you have a different format you'd like to use, please contact [email protected] and we'll be happy to review.
- Feed Locale - Specify the Language used by the originating website. We'll use this to determine the date format in the feed.
- Status - Set the feed to Running or Paused. Pausing will allow you to temporarily disable a feed without having to delete it. Pausing the feed will do so indefinitely, so you'll need to manually set it back to 'Running' when you're ready to import jobs again.
- Auto Publish Jobs - Select "Yes" to have your jobs automatically publish to your site. If you'd like to review and manually publish jobs that come through the feed, select 'No'. With 'No' selected, jobs will be created as a draft.
- Employer - Automatically assign all jobs in the feed to a specific Employer Account.
- Location - If desired, set a backup location for jobs in the feed. If a job comes through with no location specified, this Location will be used.
Set up FiltersAfter setting up your feed, you'll have the option to create filters. Find out more!
Custom Field Setup
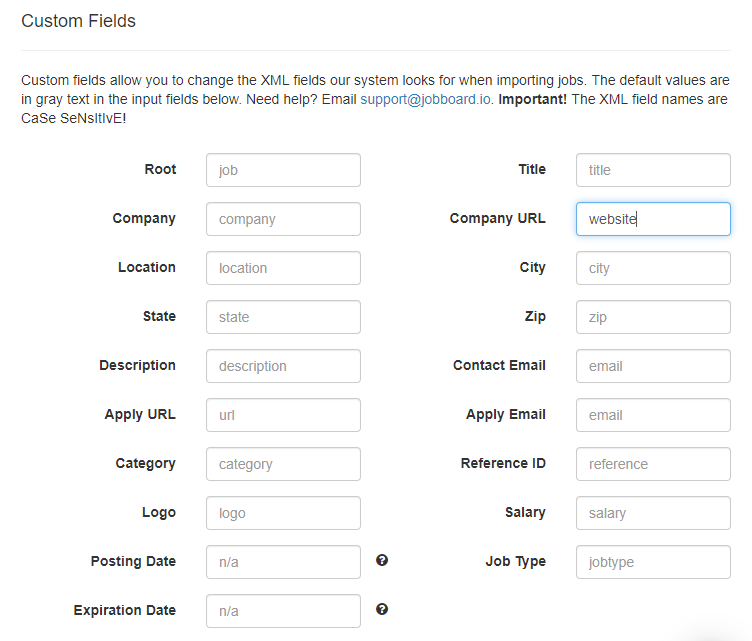
Once you have the basic information entered for your feed, you'll want to make sure that the fields in your feed map correctly to the fields in JobBoard.io. The grey letters display the default XML tag we'll look for when importing XML feeds.

By default, we'll expect the Company URL to be passed as follows:
<company_url>https://www.jobboard.io/</company_url>
In the example screenshot above, you'll see that we've entered a value of 'website' for Company URL. This lets the system know to look for the Company URL in the feed as such:
<website>https://www.jobboard.io/\</website>
Mapping out custom fields is that easy! If you aren't comfortable examining your partner feeds for tag names, we recommend asking your partners to provide a list when you get their feed URL. Many providers will already have this information documented.
After the form is complete, click Save.
Available Fields
Below, we'll cover each field available to be imported via XML imports.
JobBoard.io Field | Purpose | Default XML tag | Required? |
|---|---|---|---|
Root | Groups information for each job | job | Yes |
Title | The title of the job | title | Yes |
Company | The hiring company | company | Yes |
Company URL | A link to the company website | company_url | No |
Location | The complete job location | location | Yes, or city and state |
Remote | Is the job remote? True or False | remote | No |
City | The City where the job is located | city | Yes, or location |
State | The State where the job is located. For non-US jobs, you may map the country field here | state | Yes, or location |
Zip | The Zip or Postal code where the job is located | zip | No |
Country | The Country where the job is located | country | No |
Description | The job description | description | Yes |
Apply URL | If the application form is hosted elsewhere, add the link here. | url | Yes, or Apply Email |
Apply Email | Where should applications be sent to? | Yes, or Apply URL | |
Category | The category for the job. | category | No |
Reference ID | Set the unique reference ID for the job | reference | No |
Logo | Link to the employer logo | logo | No |
Salary | What is the salary for this job? | salary | No |
Posting Date | Set a posting date for the job. If left blank, we'll use the time the job is created in our system. Required format is: MM/DD/YYYY | No default, must be populated | No |
Job Type | Is this position Full Time? Part Time? Be sure the value used matches a job type that's been set up under 'Job Types' in your admin panel. If no type is provided, the default job type will be used. | jobtype | No |
Expiration Date | Set the expiration date. If no date is provided, we will use the default posting length for you site. Required format is: MM/DD/YYYY | No default, must be populated | No |
Feed Preview
After setting up your feed, we highly recommend using the Preview to verify that the information in the feed is mapping out as expected. To Preview your feed:
- Click Auto Import Jobs in the left hand navigation menu.
- Locate the feed you'd like to Preview, and click the corresponding Edit button.
- Click the Preview button above the form.
Be sure that the fields listed above as required have been populated. If required data is missing in the preview, follow our troubleshooting guide.
Troubleshooting Feeds
Required Fields Missing in Preview
- Copy the Feed URL, and paste into a new browser window. If your feed is in XML format, you'll see something that looks like the below example:
<jobs>

  <job>   <!-- This is the 'Root' and identifies a new job -->
  <job_title>Generator Service Engineer</job_title> <!-- Job Title -->
  <description>
  This highly respected international engineering company has had a long established presence. With over 15 years in the region they have developed an unrivalled reputation for delivery and service to their clients. Regarded by many as leaders in the power generation market they cover the spectrum of heavy industrial to medical to entertainment, as a result they can offer a unique and varied working environment.
  </description> <!-- Description is displayed within the job post -->
  <url>http://www.samplecompany.com/apply</url>  <!-- Link for the Apply Button -->
  <apply_email>[email protected]</apply_email> <!-- Email address for Apply Form.  Either a url or apply_email will be required -->
  <company>Compu-Global-Hyper-Mega-Net</company>
  <company_url>http://www.samplecompany.com<company_url>
  <city>San Francisco</city>
  <location>USA</location>
  <state>CA</state>
  <reference>12345</reference>
  </job>

  <job>   <!-- This is the 'Root' and identifies a new job -->
  <job_title>Customer Service Guru</job_title> <!-- Job Title -->
  <description>
  Build a career without boundaries. Do work that matters, with the flexibility to pursue your passion wherever it leads. Bring your ambition to make a difference. We’ll bring a world of opportunities.
  </description> <!-- Description is displayed within the job post -->
  <url>http://www.samplecompany.com/apply</url>  <!-- Link for the Apply Button -->
  <apply_email>[email protected]</apply_email> <!-- Email address for Apply Form.  Either a url or apply_email will be required -->
  <company>Compu-Global-Hyper-Mega-Net</company>
  <company_url>http://www.samplecompany.com<company_url>
  <city>San Francisco</city>
  <location>USA</location>
  <state>CA</state>
  <reference>12345</reference>
  </job>

</jobs>- Identify the missing information in the feed. For this example, lets say that the Job Title was not present in the Preview.
- Look for the Job Title and the XML tag surrounding it. In this example, you'll find <job_title>Generator Service Engineer</job_title>
- We already know that the system expects <title> by default, but this feed uses <job_title>. We'll need to update this in the Custom Fields.
- Back on the Auto Import Jobs screen, click the Edit button to open the feed setup.
- Scroll down to Custom Fields, and enter job_title in the Title field.
- Click Save and check the Preview. Continue these updates until all required fields are populated.
No Jobs Detected
If no jobs are detected in the feed, follow the steps above to check the Root. This is what separates the jobs from each other. In the example XML, the Root is <job>.
XML feed exceeds the limit
Contact our Support team! We'll review the feed and will, in most cases, increase in the limit to accommodate.
Feed is unreachable
In most cases, you'll need to contact the feed provider to have any accessibility issues addressed.
Still not working?
If everything looks good but jobs still aren't importing, check the Log. This can give you insight into data issues that might prevent jobs from importing as expected. The log will be updated daily with the results of the most recent import.

Need help?Having issues mapping your jobs? Unsure of how to correct an issue you see the logs? Contact our support team using the chat icon in the bottom right corner of your admin panel, or by e-mailing [email protected]. We're always happy to help!
Updated 9 months ago
